Wednesday, 3 October 2012

Hot chocolate toppers

I went to the Cake & Bake show at Earls Court a couple of weeks ago, and got to meet Edd Kimber, who won the first Great British Bake Off. (his new book is fab...pre order it now!) I also saw many famous baking faces- Paul Hollywood, Mich Turner, Jo Wheatley, Paul Young, and have developed a crush on baker boy Tom Herbert! And whilst there picked up some decorating ideas and lots of freebies to test. And I hope to share some of those baking and decorating ideas soon...

But today's post is a make...

As it's turning chillier we've been drinking more hot chocolate. We all love marshmallows on top so I tend to keep a bag in the cupboard, and we also like cream but I don't keep that in the fridge all the time. But I saw this idea on pinterest and thought I'd try it- Hot chocolate toppers! You can use normal instant hot chocolate, homemade hot chocolate (melted chocolate, cream and a bit of milk - evil) or even my Hot Chocolate Spoons.

It's very simple- whisk up double cream to almost stiff peaks. Spread onto a an inch deep tray that you've lined with cling film.

Freeze overnight.

Remove from the freezer then take the cream out of the tray, removing the cling film.

Set the cream 'slab'on a board, then use your favourite small cutters to cut shapes in the cream. You'll need to work quite quickly else the cream will melt.
I don't like waste so I kept the 'trimmings' too! Which I'll probably use on my own hot chocs when no-one is looking!!

Pop them back in the freezer and whenever you fancy a creamy hot chocolate, just pop a frozen cream shape on to of your drink...

Tips:
-Use metal cutters, I don't think plastic ones would cut as well.
-Have a small tub or freezer bag waiting to put the shapes straight into.
-Why not sprinkle some hundreds and thousands onto the cream before you freeze it, or swirl some food colouring in for a different effect. You could even set marshmallows in it!

Sunday, 16 September 2012

Gingerbread syrup

Admission time - I'm a big Christmas fanatic. Yes, I know it's only September, but X Factor has started, the first Strictly Come Dancing was on last night, and it's dark by 7.30pm, so to me that means Christmas is on it's way.

I mentioned before I'm on a tight budget, which means I start Christmas shopping early in order to help me spread the cost across the whole year. It also means I get some bargains because I buy things when I see them - especially when I see them in sales!!

I also like to make homemade gifts - in the past I've made movie hampers (using a homemade record bowl, filled with Christmas DVDs and popcorn), pinecone firelighters, saltdough decorations, children's 'make your own bird feeder' kits and today's make - Gingerbread Syrup.

In fact, I first started making this a few years ago, not to give as gifts, but because my hubby and I are big Starbucks fans and especially their festive 'Red Cups'. Our favourite Starbucks cup is the Gingerbread Latte, but we can't afford to drink them too often (especially as a trip there now involves drinks and cakes for Mini and Dollop too), and we really missed them at the end of the festive season one year. So I searched for a recipe for something I could use at home instead. After lots and lots of making, coffee-drinking and testing, I came up with the following recipe. Incidentally, this syrup is great over icecream and in hot chocolate too. If you want to gift it, then you can buy pretty bottles, or use empty, clean ketchup bottles!

4 cups granulated sugar (for this and the water I use a standard coffee cup)
2 cup water
2 tsp ground ginger
1 tsp ground cinnamon and 1 cinnamon stick
1 tsp ground nutmeg
1 tsp vanilla extract
Sterilised glass bottles*

Put the sugar and water into a very large saucepan over a low heat. Gently stir until the sugar is dissolved to make a basic sugar syrup.

Add the spices and vanilla, then turn the heat up to medium, allowing the syrup to boil until it thickens slightly...til it's the consistency of something like maple syrup (runnier than goldren syrup), almost like washing up liquid! Don't worry if you get foamy stuff on top, though you can skim it if you wish. At this stage you can also strain through muslin if you like - but you don't have to.

Leave the syrup to cool slightly, remove the cinnamon stick if you haven't already strained the syrup, then pour into the sterilised bottles. Once cool, add a label. In coffee, we find that we use just enough to cover the bottom of the mug, and we love it with both instant or ground coffee. And we find it keeps best in a cool dark place, not the fridge.

*the best way I've found is to wash the bottles in hot soapy water, then rinse and put into a cold oven. Turn the oven on to about 140C, and 'cook' the bottles for around 15minutes. Fill whilst they are still hot. Hot liquid poured into cold bottles can cause the glass to crack or worse, explode.

Wednesday, 12 September 2012

Quesadillas

I'm a planner (I know, I know...don't hate me!) but I have a small, strict budget and meal planning each week enables me to keep within my means, and make the most of leftovers and good offers at the supermarket. Despite my small budget, I want - like most mums - to give my family proper homecooked food. However, I often struggle with thinking of different things to feed them. They're not *too* fussy, and Mini is getting more experimental as he gets older.
So as I was planning this weeks meals, I realised that due to a change of plan one night (we had surprise fish and chips at the seaside) I had a packet of flour tortillas left in the cupboard. I know I could have frozen them, and often do, but Mini has just declared these tortillas to be the best things ever after Chicken and Coleslaw Wraps last week, so I thought I'd use them.
Wraps - yep but had those last week, Mexican Lasagna (the original intention, using chilli for the filling and the tortillas in place of pasta sheets) - but didn't fancy that, so thought I'd offer Quesadillas, with salad on the side. They went down really well, and both children have asked for them again another time.

So you need:
Flour tortillas - you need 2 for each Quesadilla. (1 Quesadilla per adult was enough, and half of a Quesadilla each for my two was just right).
A mozzarella ball, ripped into small pieces. (1 ball does about 4 Quesadillas)
Cheddar cheese - grated, a small handful per Quesadilla.
Salad of your choice.

Preheat a couple of frying pans - they must be large enough to lay a whole tortilla in flat. Brush each pan with a little sunflower or olive oil.
When the pans are hot, lay one tortilla in each, then dot the Mozzarella around the tortilla, sprinkle over the cheese (but not too close to the edges) and then finally lay another tortilla on top.
Give it a minute or two to cook - you want the bottom tortilla to be crisping on the outside, so carefully use a spatula to lift it and have a check. When it's crispy enough it should be easy to flip, so you can then crisp the other side. The cheese should be all oozy and melted inside.

When crisped on both sides, remove from the pan and cut into 6 or 8 wedges and serve with salad of your choice.

Including preparation and cooking these were ready in about 10 minutes, so quick for a warm meal.

In the past the NC and I have had these with Tomato Soup that's been perked up with a sprinkle of chilli powder...very yum, and in the winter I might do this for the children (without the chilli powder!). I didn't think I would feel full up after eating one of these, but I really did, and so did the NC.

Monday, 3 September 2012

Really easy cream slices

Recently we held a surprise anniversary party for my in-laws upcoming Ruby Wedding anniversary. As it was an afternoon tea party, cakes featured heavily! But I didn't want to just make cakes, so my sister in law made a load of gorgeous little sandwiches, and I made these incredibly easy cream slices too. They went down a treat, in fact the raspberry cream slices all disappeared, and there were just a few blueberry slices left.


You will need:
Puff pastry (shop bought or homemade), just a standard block
1 egg, beaten
A little caster sugar
A little flour for rolling

For the filling:
A large carton of double or whipping cream
Fresh fruit of your choice

Preheat your oven to 180C.
Sprinkle flour on your rolling surface.
Roll out the puff pastry to around half a centimetre thick. Then simply cut into 5cm squares. You can re-roll the trimmings once or twice, but after that the pastry will not puff as well and will become tough.
Place on a baking sheet and brush each square with a little beaten egg, then sprinkle a small pinch of sugar over the top.
Bake for around 10 minutes or until puffed up and golden brown. When done, immediately remove to a cooling rack.

Whilst the puffs are cooling, whisk the cream to stiff peaks and pop it into a piping bag with a large nozzle. (If you don't have a piping bag, you can use a knife or pallette knife to spread it instead).

When the puffs are cooled, gently ease the tops off each one. They should be easy to split open like this.
Then pipe or spread the cream inside, top with the fruit of your choice, and place the lids back on.

See, how easy is that?? The hardest bit is splitting the puffs open, and that's really easy! You can even make the puffs (but don't fill them) the night before, just make sure you put them in a tin (not plastic tub) which will help keep the pastry fairly crisp. And feel free to experiment - flavour your cream with vanilla or rose essence, use sliced peaches instead of berries, mix chocolate ganache with the cream, drizzle the tops with runny icing, dust with icing sugar or edible glitter...go mad.

Tuesday, 14 August 2012

Grape Caterpillars

Such a great little make. I put these together quickly for my children, but I'm sure they would have enjoyed 20minutes or so putting them together themselves!

In the holidays, Monday afternoon is always 'Movie Afternoon'. I do a 'Now Showing' poster with a picture of the film and details of the snacks that will be served, and I try to link (loosely) those snacks with the film. So for The Jungle Book, there was popcorn with surprise jelly animals at the bottom. For Toy Story we have cartons of juice with Woody and Buzz on, and cookies to go with. These Grape Caterpillars accompanied A Bug's Life!


What you need:
Grapes
Chocolate drops
A little melted chocolate or icing
Wooden skewers

Simply thread 8 or so grapes onto a wooden skewer. Using the icing or melted chocolate as 'glue' stick the chocolate drops onto the end grape as eyes - da da!

Obviously be careful using the wooden skewers do not stab yourself when assembling, and closely supervise the children eating them too.

Friday, 10 August 2012

Lego jelly

Hmm.... well I think I said I might be brave enough to post some of our 'failures' too. Here's the first one...

This sounded simples. Get mega blocks (large duplo), clean, fill with jelly and set. Hey presto - lego style jelly.

In reality, it didn't quite work. Mega blocks are actually divided inside, so even the largest pieces only created 1 small piece of jelly. And they weren't the easiest 'moulds' to release the jelly from, so despite dunking briefly in warm water, they took a while to make that lovely slurpy sound and slip out, and by the time they did, the tops of them had melted somewhat and that distinctive lego shape had disappeared and turned into a more rocket shaped lump.

We managed one or two pieces that looked as they should have, but we had to explain to Mini what they were supposed to be, as it clearly wasn't obvious!


In case you want to give it a go - just make up jelly as per the packet instructions and fill your moulds as you usually would. Perhaps a light oiling might help?

Wednesday, 8 August 2012

Nature Paper

Another crafty make this time- Nature Paper, but we managed to combine this one with another of our summer holiday activities -  a Scavenger Hunt.
I've made up a number of bingo style cards with 9 different images of things Mini is likely to find whilst we're out walking - ants, cars, postboxes, double yellow lines, trees, birds etc etc, and sometimes when we go out he takes a card and a pencil and gets a little treat (usually a small pack of Haribo or something similar) when he gets all 9.

Last week, the activity was to complete the scavenger hunt on the way to the shop, and on the way back we had to collect a variety of natural objects - leaves, large and small; petals; flowers; seed heads; feathers; grasses etc with which to make nature paper. At the time though Mini just knew that we needed lots of different bits for a project. The anticipation of what it could be, was enough to keep his interest on a 20minute walk. And I was able to do 'the talk' about picking/not picking, dangerous/safe and not eating berries when you don't know what they are!

What you need:

Natural objects, as mentioned above. Enough to fill a small cereal bowl should be enough.
Sticky backed plastic (also known as contact paper)
Patience

This is definitely a craft to do with your children - they will get in a pickle without your help.

Lay out all your nature finds so you can quickly see what you have.

Cut two squares of sticky backed plastic, roughly the same size - about 30cm square(ish).

Unpeel the backing off one piece of plastic and carefully distribute your finds all over the sticky side, leaving some space in between (you'll see why shortly). Make sure they are pressed down firmly.

When happy with your design/pattern, carefully unpeel the backing on the other piece of plastic and lay the sticky sides together, pressing it firmly down, especially in the gaps between the items. This will ensure the plastic stays stuck together. Trim off any excess sticky backed plastic.

Now you have nature paper - you can use it to decorate cards, or as we did - make suncatchers. Experiment with fresh/dried leaves, or fresh/pressed flowers and see what works best and looks nicest.

Sunday, 5 August 2012

Play dough

Lots of foody posts so far - here's my first crafty one. Again, this was from an activity pack that I did with the children.

A good old favourite, who doesn't like play dough? Over the last few years I've tried several recipes for homemade play dough but this one is by far the nicest. It's quick & easy and the final result is smooth, soft and squishy.
 

You will need:
1 cup of flour
1 cup of warm water
2tsp of cream of tartar
1tsp oil
1/4 cup of table salt

 Put all the ingredients in a saucepan and heat over a low-medium heat. Mix with a wooden spoon until it all comes together, forming a ball.


Knead until smooth, then play.

This lasts for ages too. Just keep it in a sealed bag.

For an extra dimension you could add some food colouring, or drops of scented oil. You could even try glitter!
Practising roses!

Note: Of course, using the saucepan is a hot job and that part is not recommended for children. But Mini liked scooping the ingredients and giving it a good mix together.
He also enjoyed playing with the dough whilst it was still warm, and kept giving Dollop status updates about how quickly it was cooling down.
This was Dollop's first time with play dough and she thoroughly enjoyed it, she didn't even try to eat it until Mini suggested it to her. However, one lick was enough to stop them both 'testing' it even more!

Saturday, 4 August 2012

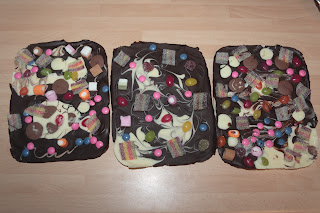
Chocolate sweetie slabs

I'm aware that quite a few of my posts include chocolate and marshmallows. There is a good reason for that - they are quite frankly delicious. But the real reason is because I'm adding quite a lot of posts in a short space of time it looks like I make lots of things with chocolate and marshmallows in. Actually these makes have not been everyday, and are consumed in moderation as part of a balanced diet.

All that said, this particular post is all about the chocolate! You know those lovely looking mini (and giant) slabs of adorned chocolate you can buy at posh chocolatiers? Well, you can make them yourself! And what's more, the kids can help!


What you need:

200g bars of dark/milk chocolate
100g white chocolate
Mini marshmallows/jelly tots/dolly mixtures/jelly beans/chocolate buttons/toffee covered popcorn/smarties - basically any sweets that take your fancy!

Foil
Plastic lids such as margarine tub lids - this quantity of chocolate will fill 3 medium sized margarine lids.

Start by lining the inside of your lids with a layer of foil. This will make the chocolate slab easier to remove. Your slab will be the same size and shape as your lid, so you could play around with other shapes and containers if you want...just make sure they're about 1cm high, and lined well.

Break up the chocolate and melt separately in short bursts in your microwave.

Now divide the chocolate evenly between the lined lids, swirling it together if you so desire.

Whilst the chocolate is still wet and melted - adorn it! Pop the sweeties onto the chocolate, slightly pressing down as you go. Pop in the fridge or a cool place to set. Then break or cut and eat! (Or bag up for homemade gifts).


Above is Mini's attempt. At 5, he was just interested in putting as much as possible on!
Below is Dollop's attempt after the foil had been removed. Even at just 2, she is clearly artistic and creative (!), and has managed to make a skull shape on hers...


This much plainer version is that of my hubby - the NC, who was more careful with his sweetie placement and included some artistic swirls using a cocktail stick!


NOTE - we used 3 of these medium sized lids. The slabs turned out just fine, but the chocolate was a little thin on two of them. Perhaps an extra 100g of chocolate would do better.


Hot chocolate spoons

I know, I know...not really the time of year for hot chocolate is it? But, my kids really enjoy a hot chocolate as a treat, and I'm quite partial to a cuppa of the yumtious (and yes, that is a word!) stuff myself, especially with a few marshmallows floating on top!

So, for another of our activity packs I decided to make 'Hot Chocolate Spoons'. My local supermarket is selling something similar for about £1 each, but thrifty me decided they could be done much cheaper, and we could even gift them later in the year.


You will need:

Plastic spoons (we used the cheapest ones I could find in Tesco)
100g Dark chocolate
Small bag of Mini Marshmallows
Sprinkles

Break up the chocolate and place in a microwaveable bowl. Microwave in short bursts to melt the chocolate. 
Whilst the chocolate is melting, lay out the plastic spoons on a plate or tray. 
Once melted and smooth, dollop the chocolate onto the spoons making sure you put on as much as possible. Decorate with about 3 marshmallows and a few sprinkles - really easy for the kids to do! Then leave in the fridge to set. 

To use, heat some milk in the microwave and pop a Hot Chocolate Spoon straight in. Leave it a minute to melt and then stir a few times. Voila - a mild hot chocolate perfect for children (or for mummy!)